To Infinity and Beyond - Becoming a Better DopeyBadger (Comments Welcome)

It's interesting how our lives have certain parallels also having to abort a marathon recently. Are you still doing training runs? I'm happy you didn't put in so much training and then have difficult marathon weather.

Love seeing the progress on the costumes!

@GollyGadget - very cool to see Canova actually posting on LR (funny I always thought it was Casanova)

LIIFT More has been the primary and running the secondary. Although I’m content at this time just fitting in what I can when I can. Hoping to move to something more structured in June. But we’ll see.
 
Amphibia Costumes - Anne's Hair - Part 16

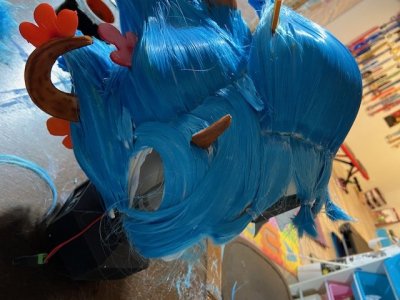
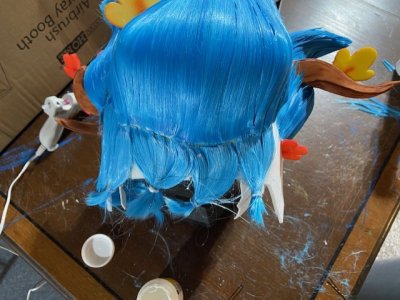
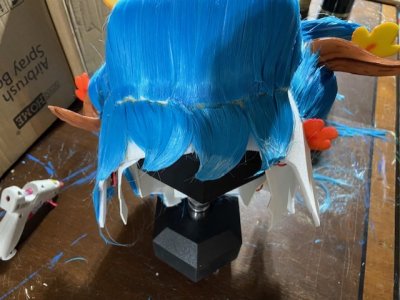
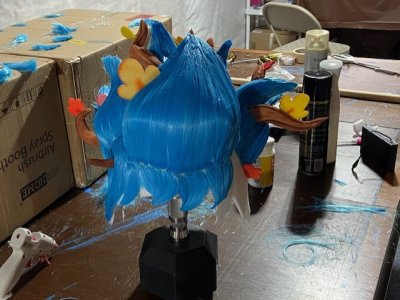
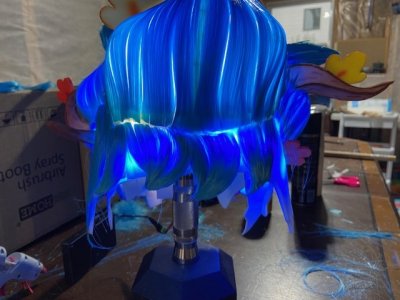
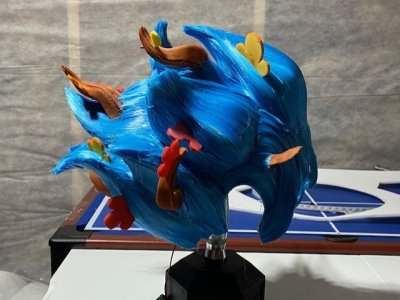
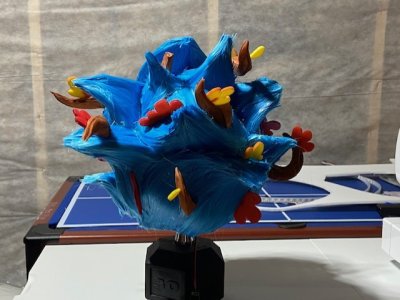
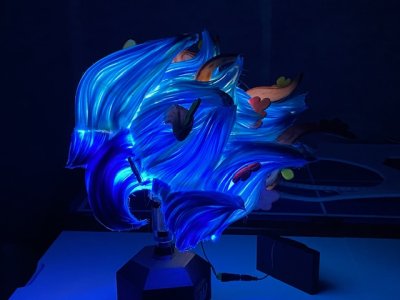
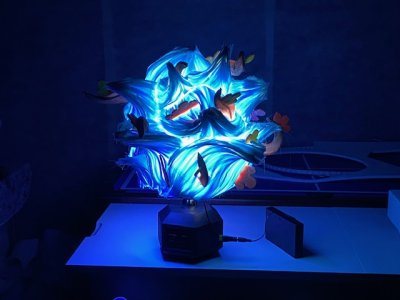
Well let's start off with the good news, I was able to find a matching color wig. Which honestly was a big relief. Because I just didn't have enough from the original wig to finish the piece, and my preference was to have the color the same throughout. Only one minor difference was that this wig was styled with a wavy appearance, so the hair isn't completely straight. But that's not all bad. I used that to my advantage in places where having some curls/waves would be helpful. We're coming down the home stretch of finishing the piece now. In one test run we found the left ear hole is slightly off somehow, so that'll have to be addressed, but G had a friend over and was too squirrely to get it settled. But with the additional hair, I could finish up the sideburns and bangs.

1714579882003.png

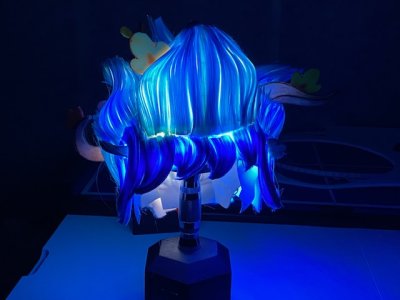
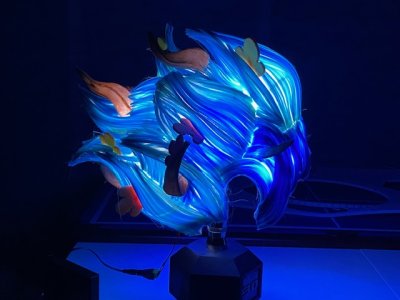
I'm still working on the sideburns, but here's where they're at. Also, I used a touch too thick of hair for the sideburns so the light from underneath can't really get past. But that's alright as a little darker is fine.

thumbnail_IMG_7154.jpg

Anne has swoopy bangs that aim from right to left. So that was the goal. I put the hair in bunches and then hair tied them together.

thumbnail_IMG_7153.jpg

I used the Mod Podge to hold that in place, then once dry I cut the tips off to give it the motion appearance we were going for.

thumbnail_IMG_7160.jpg

thumbnail_IMG_7165.jpg

The seam with the hair line is ok, because that's where the crown will go. So you'll never see it anyways. G's a little upset that the tips of the bangs aren't blunted enough (too pointy), but that's a hard fix at this point. We'll see how it looks when she puts it on. The bangs light up well.

thumbnail_IMG_7163.jpg

Once we're 100%, then I'll cut away the foam that is uncovered by wig hair (as long as there isn't a light directly underneath).

Thankfully we're almost wrapped up here which means we can start working on other aspects. I've done some work on the tennis racket, checked out the uncanny LED eyes, and started working on the armor paint color choices. The tennis racket and eyes are too early to share anything about yet, but I've got some stuff to share in the next post about the armor color choices.

Next - Armor Color - Part 1
Next Anne Hair update - Anne's Hair - Part 17
 
Last edited:
Amphibia Costumes - Armor Color - Part 1

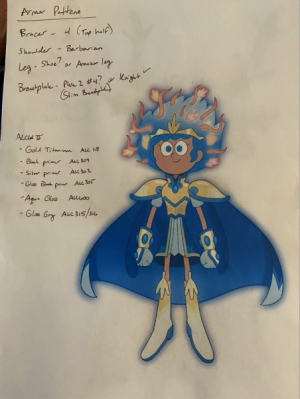
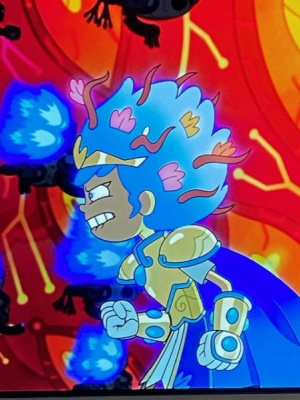
Jumping around a touch, but figured I'd share an update about the armor color choices. First off, as a reminder, these are the two images we're working from to create these characters (link). Anne has a gold armor (with three different shades) and Darcy has a dark purple/black (with two different shades). Both have a metal appearance. This is why we invested in the airbrush setup because we didn't think we could achieve the look we were aiming for with acrylic based paints. I spent a lot of time reviewing different options and ultimately settled on the Alclad II brand lacquer (link) based paints based on the following videos:


One of the most important advantages of Alclad II was the flexibility of the paint and how it didn't break up when flexed. So we're hoping that's true for most of their lines of product.

I've purchased them either through Amazon or Ebay as neither seems to have them all.

We're still in the testing phase, but here's what we've done thus far.

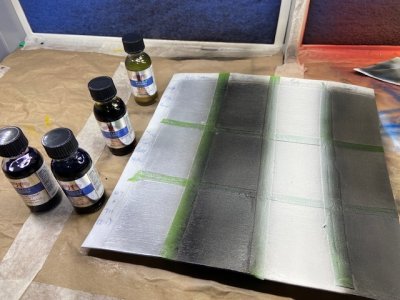
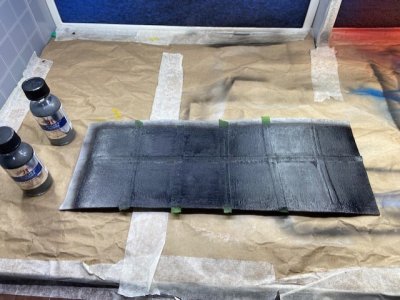
First off, I put down two layers of Flexbond (link). I'm still on my original bottle, so it goes a long way. I used a paint brush to apply it to a piece of 2mm thick high density foam (link). In varying thicknesses, this is the foam we plan on using to construct the armor.

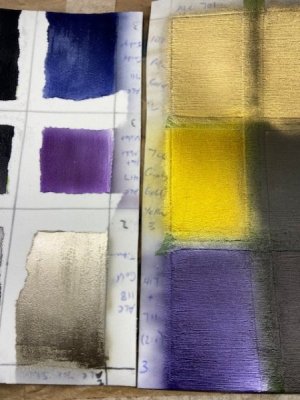
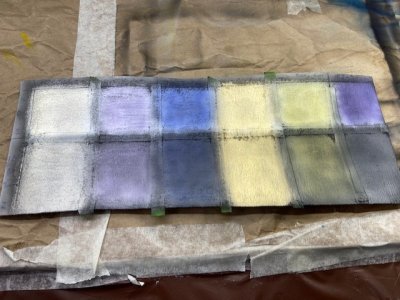
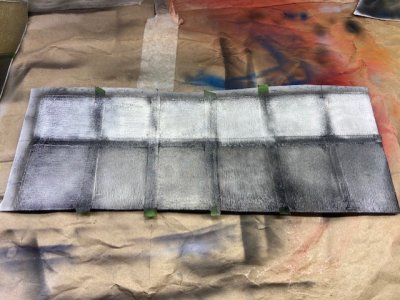
After two layers of Flexbond and allowing it to dry overnight, I then laid out a grid pattern for testing out my 12 different combinations.
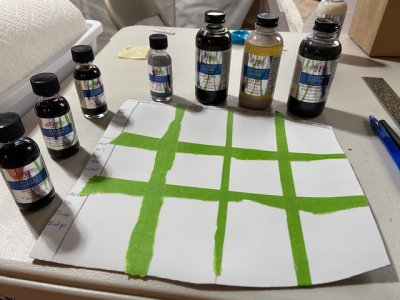
thumbnail_IMG_7155.jpg

For bases, we're initially testing the following:
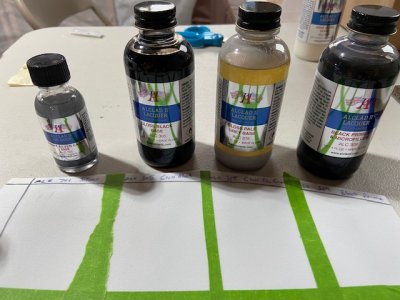
thumbnail_IMG_7156.jpg

ALC 701 - Bright Silver Candy Base
ALC 305 - Gloss Black Base
ALC 315 - Gloss Pale Grey Base
ALC 300 - Black Primer & Microfiller

Each of these have different preferred number of applications and pressure settings on the airbrush.

For colors, we're initially testing the following:
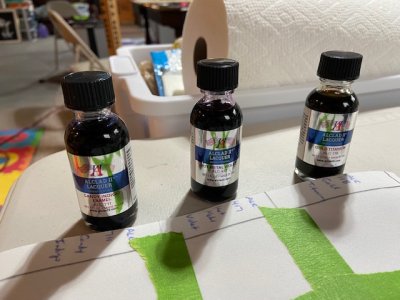
thumbnail_IMG_7157.jpg

ALC 118 - Gold Titanium
ALC 417 - Hot Metal Violet
ALC 711 - Candy Indigo Enamel

For application, I went through and added a layer as described of each of the bases. I should note that some of these look vastly different in person than they do in pictures.
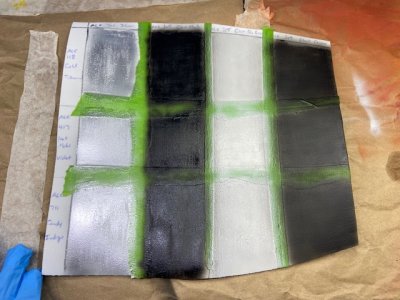
thumbnail_IMG_7166.jpg

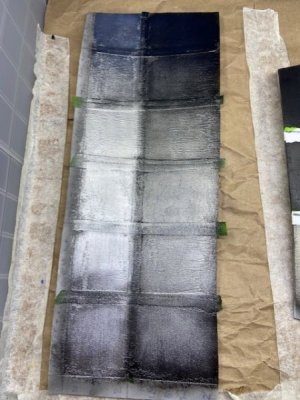
The ALC 701 bright silver gives off a true metallic appearance, but shows the brush strokes way more. The first three are all shiny, and the fourth has a more matte appearance.

ALC 701 only calls for a single layer, and it's possible it was already in a good place, but I went ahead and added another layer. The other three called for 2-3 layers.
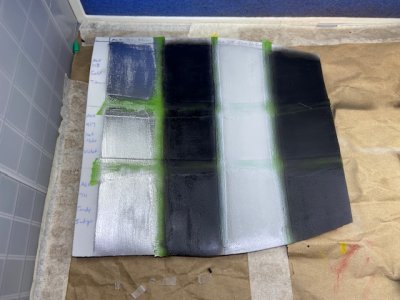
thumbnail_IMG_7172.jpg

I don't think it harmed anything having a second layer for ALC 701. The other three definitely benefited from the second layer. I let everything dry overnight and checked it the next morning.
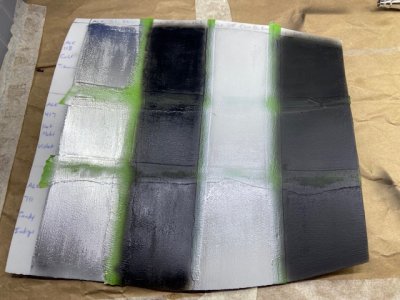
thumbnail_IMG_7177.jpg

Ultimately, the appearance the next morning was overly different than right after the application. Maybe a little more shine in the bright silver. After showing these based to G, and without even applying the colors to them, she was most interested in ALC 701 Bright Silver Candy Base. Which is hilarious to me. Because we spent a lot of time reviewing Youtube videos, and she was adamant she didn't want the super reflective metal appearance because that's not "tv show accurate". But I told her there's a difference between tv shows and real life. It's really hard to draw reflective surfaces in a cartoon over and over because it requires so much extra work. And so in real life, they're metal armor may very well be reflective. Once I gave her this explanation, she encouraged me to buy the even better and more reflective bases (ALC 107 Chrome and ALC 124 Black Chrome).

One thing that was very evident is the importance of the Flexbond layer. I wasn't completely accurate in my airbrushing and some of the base ended up on portions of the foam that I didn't apply Flexbond to, and those sections turned out completely different and blah. So the stroke pattern and doing it period is really important for the Alclad II paints to work well. I was going to skip that step, but you can't.

Next up was applying the colors. So all the bases were vertical, and now the colors were applied horizontally. So ultimately we'd get 12 different combinations. Again, each of the colors had their own instructions on application. Additionally, some recommended different base choices, but we wanted to branch out and try several different just to see what happened.

After the first application:
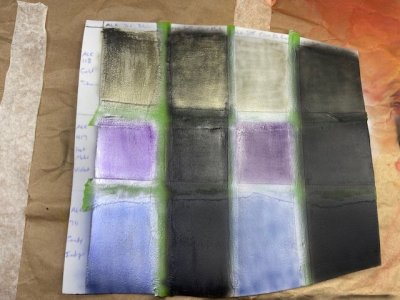
thumbnail_IMG_7178.jpg

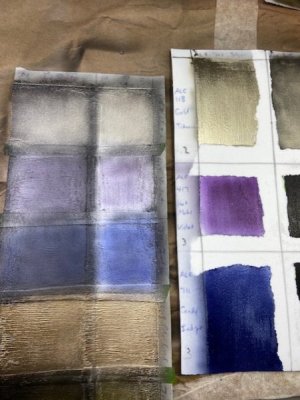
ALC 118 Gold Titanium was super spotty on the three other bases (305, 315, and 300) but it really stuck well to the candy base base (701). I was really surprised to see that neither the violet or indigo worked on the two black bases. They both worked well on silver and grey, but definitely needed more layers.

After a second layer:
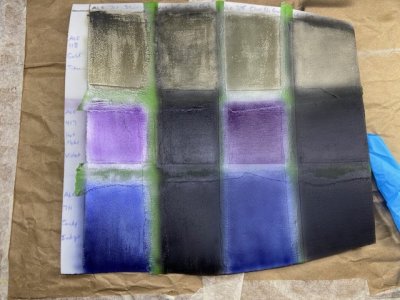
thumbnail_IMG_7180.jpg

All three colors got a second layer. I'm not sure the ALC 118 Gold needed another layer. It was in great shape after two layers. All three gloss/shiny ones are super reflective. The matte has a different appearance. G's top choice is the first quadrant (ALC 701 Base and ALC 118 paint). So that'll cover the majority of her armor, and then we'll need to figure out options for the other two slightly paler golds.

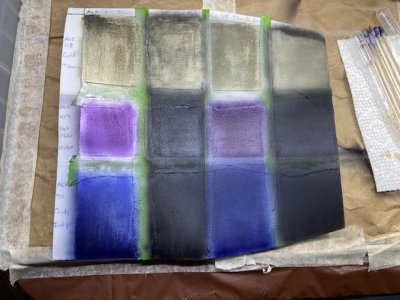
For the Darcy costume, it was clear the second layer of violet and indigo wasn't enough. Still to blotchy, and not quite the color we're aiming for. So I added a third layer to both. I'd say there were 20-30 min between layers.
thumbnail_IMG_7183.jpg

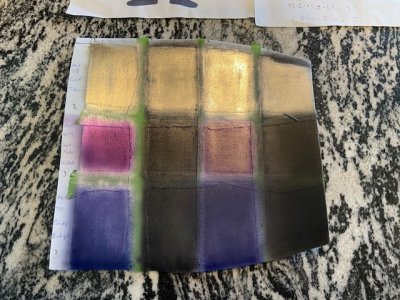
After the third layer for violet and indigo, they were definitely darker and less blotchy. So I think that's a good ending place for them. We let the whole set sit out overnight to dry.
thumbnail_IMG_7185.jpg

The next morning saw little change from the evening prior. The ALC 118 gold is noticeably gold from any angle, and has a high shine in light. The ALC 417 violet and ALC 711 indigo are definitely light dependent. If you're off direct light, then they're both a deep dark color verging on black. But then in light brighten up to the rich violet and indigo colors. G isn't sold on either being the right color. I'm more in favor of violet, and Steph thinks the indigo is closer to right. Alclad only has one other violet (it's a candy violet) so we don't have many other options. I've got a couple of thoughts.

1) I could try mixing the violet and indigo at a set ratio (like 2:1) and then see if it gives me the desired color.
2) I could try painting a thin layer of indigo over the violet to see how much it dark purples it.

I'm also interested to see how the violet and indigo appear with the new bases of Chrome and Black Chrome. I've got some hope for Black Chrome giving me that desired slightly darker purple on the violet color.

We also ordered one other Gold (ALC 706 Candy Golden Yellow) to see if we can get a slightly different tone of gold for the Anne costume.

All in all, it was nice to change things up for a bit and work on a different aspect of the project given so much time has been placed into Anne's hairpiece at this point. The airbrushing was definitely the right choice. The final product at this point is far superior to what I would have been getting with the acrylic based paints.

Next - Anne's Hair - Part 17
Next Armor Color Update - Armor Color - Part 2
 
Last edited:
Amphibia Costumes - Anne's Hair - Part 17 (Pretty much final!)

Just about finished with the hair piece for the Anne costume. Based on my notes, we started on March 4th. So it's taken just about two months of exclusive work to get this piece finished. There's some odds and ends to wrap up (including the crown), but by in large it's finished.

So as a reminder, the goal was this:

1715027748768.png

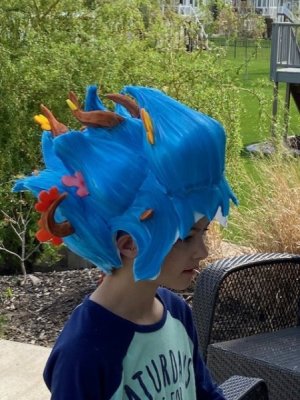
and on G's head it looks like this:

thumbnail_IMG_7189.jpg

*This picture is missing some of the final touches seen in later images. Ultimately, I'd say we hit the mark.

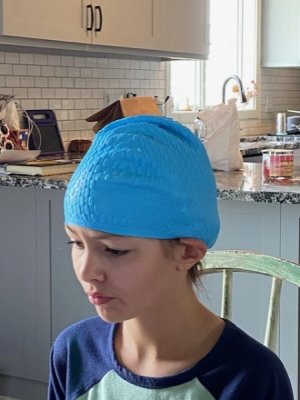
I wanted to find something to protect G's hair while wearing the piece, with a slight hope that something with texture and a high coefficient of friction would better keep the hair piece on her head. I found this swim cap that sort of hit the mark.

thumbnail_IMG_7187.jpg

It works well, but isn't perfect. So ultimately we'll likely afix a chin strap to the piece to better keep it on her head. She learned some tricks with makeup coverage during her recent stint as a munchkin in the Wizard of Oz play. So we'll use that technique to hide the strap better than the Monster's Inc costumes.

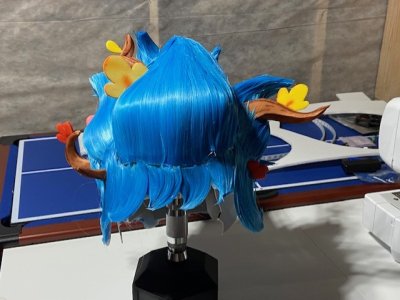
As for the surround view:

thumbnail_IMG_7191.jpg

thumbnail_IMG_7194.jpg

thumbnail_IMG_7193.jpg

thumbnail_IMG_7201.jpg

thumbnail_IMG_7198.jpg

thumbnail_IMG_7202.jpg

thumbnail_IMG_7203.jpg

Just a few snips here and there, and then it should be finished. I'm likely to seal this one up with the skull cap and hair piece hot glued together. As long as the connections don't break, there isn't anything on the inside that I need to access. I can always cut away the cement glue seal if something goes completely wrong. But we're unlikely to be able to fix anything if the error occurs while on a trip or on location anyways. The battery cord is outside the system and thus don't need access for that reason either.

Proud of this piece. It was a long and tedious process once the wig hair part started. But the piece is 1000% better with the wig hair than if I had simply airbrush painted the foam. Gives it a really authentic look. On to the next part of the project!

Next -
 
Amphibia Costumes - Armor Color - Part 2
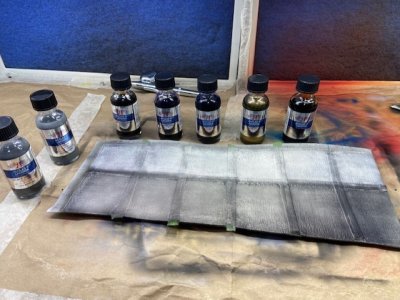
Alright, so we had previously tested 12 different combinations of base + colors, and had another two sets of 12. So let's see how they turned out.

We ordered two new colors:

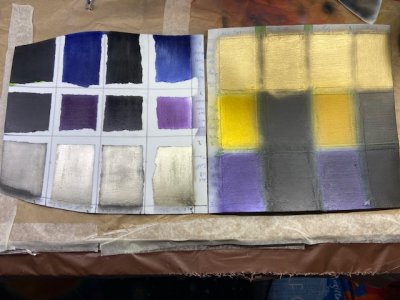
ALC 108 - Pale Gold
ALC 706 - Candy Golden Yellow

Additionally, we tested a combination of the ALC 417 - Hot Metal Violet and ALC 711 - Candy Indigo Enamel in a 2:1 ratio. The hope was to see if we could make the Hot Metal Violet a touch darker and more purple.

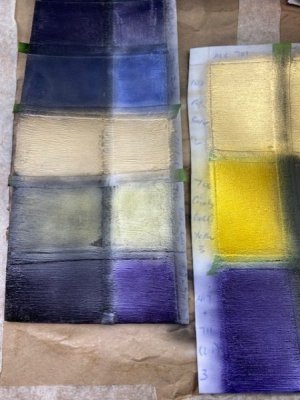
thumbnail_IMG_7234.jpg

I ended up doing the same as before in terms of number of coats. The golds only need two coats and the colored paints need three coats.

thumbnail_IMG_7236.jpg

So on the left side of the above image is the original set of 12 paints (Gold Titanium, Hot Metal Violet and Indigo), and then on the right side is the new set of 12. The original set is upside down so the bases are reversed. The Pale Gold is more yellow and brighter than the Gold Titanium. The Candy Golden Yellow is too yellow and likely won't work for our purposes with these bases. The combo of violet and indigo took away some of the luster of the hotel metal violet, but did achieve a more purple color.

thumbnail_IMG_7238.jpg

The next step was to try two new bases.

ALC 107 - Alclad Chrome for Plastic
ALC 124 - Alclad Black Chrome

I tried to take some tips from online to reduce the brush strokes visible when using Flexbond. A wider tip brush, and more thinner coats. It worked some what, but they're still visible. So in the future, I'm going to need to test out thinning out the Flexbond with water to try and get a smoother consistency. But for now, we'll just evaluate the color and not the overall look of the finished product.

To start, you need to put down a base of ALC 305 - Gloss Black Base before the chromes.

thumbnail_IMG_7233.jpg

The recommendation is to go really light on the coats. Less is more. So I did that, but in my opinion it was still a little too patchy.

thumbnail_IMG_7235.jpg

There was a definite difference between chrome and black chrome. The camera doesn't quite pick it up though. Black chrome is darker and has a little yellow in it. We went ahead and did a second coat to try and reduce the patchiness.

thumbnail_IMG_7239.jpg

Definite improvement on the second coat. Depending on how you hold it, in person all of these squares (top row and bottom row) have the same appearance. But you can tell the reflectiveness of the material based on the above as you get a lot of different looks based on the angle.

After giving it an evening, it was time to throw some colors on there.

thumbnail_IMG_7241.jpg

We were testing all five colors plus the combo violet/indigo.

I ended up doing two layers of each of the colors, but looks like I only took pictures after the first layer at the moment.

thumbnail_IMG_7242.jpg

So the patchiness is gone, but that's about what they looked like.

Compared to the other bases:

thumbnail_IMG_7243.jpg

thumbnail_IMG_7244.jpg

The golds (Titanium and Pale) just really don't care that much what base they're on. Other than the non-gloss black, and gloss black, the appearance is nearly identical across all of the different bases. Those two blacks just have a slightly darker appearance. So with that in mind, and not any benefit to the Gloss Black + Chromes, we decided to go with the ALC 701 - Bright Silver Candy Base for both golds. The Pale Gold will be the main armor color, and the Gold Titanium will be the accent color for the Anne costume.

A similar story of the Darcy color choices. The combo of violet/indigo lost the luster so it was out. The gloss/chrome combo offered no distinct advantages to the silver candy base. I like the depth and color changing in the combo of silver candy base + hot metal violet. Depending on the angle, it's either a bright violet or practically black. We'll use the indigo blue with silver candy base as the accent color.

After the base + color comes the finish coat, and since we're looking for a metallic shine we've been using ALC 600 Aqua Gloss clear coat which has a transparent finish. It does make a difference though because the paint doesn't really come off to the touch unlike when the clear coat isn't on it.

So the only step remaining in color choices is fine tuning the Flexbond primer to remove the painted on lines. Otherwise, I think we've got our system down.

Next - Darcy Helmet - Part 1
Next Armor Color Update -
 
Last edited:
Amphibia Costumes - Darcy Helmet - Part 1

Now that the Anne hair piece is essentially finished, it's time to turn our attention to my headpiece, the Darcy helmet. The hive mind has taken me over!

As a reminder, this is the look we're going for (link). G set out the following goals for this costume:

-#1 on the list is placing three LED screens in the helmet to make uncanny moving eyeballs (link).
-The horns should be big, bold, and beautiful.
-The armor should look like metal and be purple.

I did some searching around for what others have done for Darcy cosplay, and there seems to be two different paths people take. In the Amphibia cartoon, Marcy/Darcy's head is circular/oval shape. Not really reality human like. So when she wears the helmet, it's a sphere. So some cosplayers make a spherical helmet, and some go with a form fitting helmet. Since we're aiming to go more cartoon accurate when we can, we opted for a spherical helmet.

So I went back to my sphere pattern from Kamui Cosplay (link). For $3, this pattern has come into a lot of uses in short order. The next decision for the sphere helmet was deciding on the size of it. We had a couple of things in mind when making this decision. First was, we just generally speaking didn't want the helmet to be too small or too big. My head is about 8.5-9 inches from my chin tip to the top of my head. So something like 15 inches would be nearly double, and something like 9 inches would be tough to fit my head into since it would be a nearly equal diameter. The other consideration were the uncanny eyes LED screens. They are a 1.25inch square. So we measured the Darcy image and then did some scaling calculations. Again, we learned that if we go too big, then the pupil/iris is going to look proportionally too small. But to be exact matching we needed to be around 9 inches in diameter which we knew was too small for my head. So we thought 11 inches was a good middle ground. Not too big that the eyes were dwarfed in size and not too big that it looked unusually large on my head. But also big enough that it could fit. We did some math to convert the 11 inch sphere diameter into how long 1/2 of the circumference would be to determine the length of each of the individual 8 wedges. Kamui Cosplay had us covered though because in the PDF printout it has conversions for poster printing and scaling to get different size spheres. So the math lesson G and I went through was useful for life, but not for the project per se. Oh well.

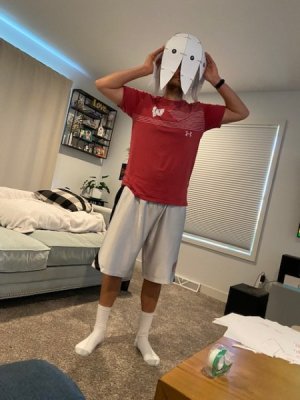
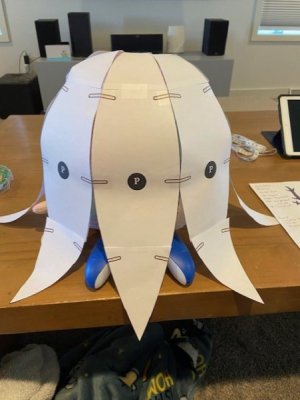
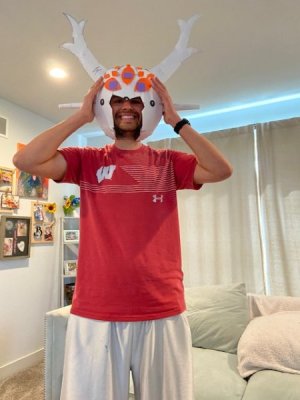
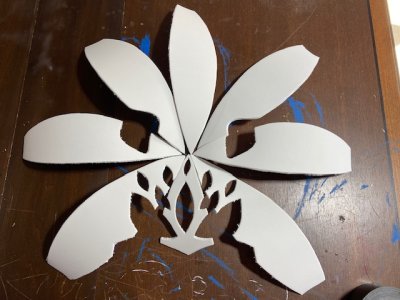
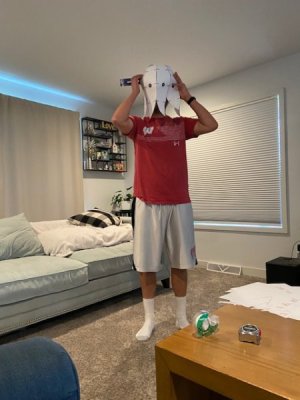
So we printed off the sphere pattern. The plan was to build the entire helmet in paper form, so they we could make decisions on how we wanted to construct the piece, and then we'd go to the foam finalization step when it became more permanent. So we cut and tape each of the 8 wedges together. We left the bottom open because at some point we'll lop off some of the sphere so my head can fit in it. G was my photographer, and she apparently prefers the angle shots.

thumbnail_IMG_7205.jpg

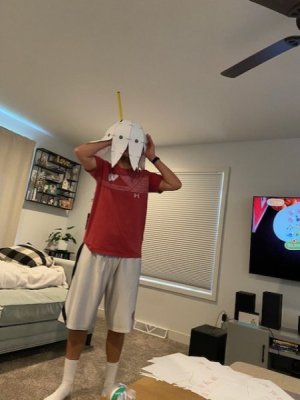
We liked the overall size of the helmet. So the 11 inch choice was the right one. We took the proportion calculations and determined that an 11 inch sphere helmet has a 6 inch horizontal horn, and a 12 inch vertical horn. So we verified what that would look like with a ruler.

thumbnail_IMG_7207.jpg

thumbnail_IMG_7209.jpg

Still in agreement that it looks right, so we moved forward to the design stage. Took a bit to find something that allowed a good working space underneath the sphere. It was slightly too big for a standard basketball (which was surprising). We ended up finding a squishmellow that when turned upside down had a good shape to work with. But it didn't stand up well on its own. Ended up using an Xbox controller to hold it in place.

thumbnail_IMG_7211.jpg

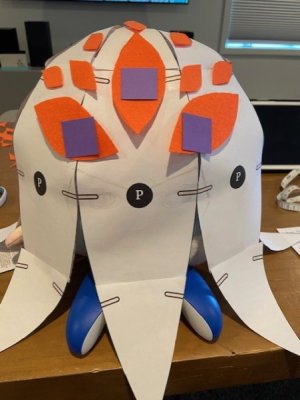
The first step was determining where the middle of the helmet would be on my head. We settled on the exact middle (the P) being right about the middle of my forehead. Now here's where our Darcy helmet has to deviate from others and from the cartoon. In the cartoon, Darcy's eyes are covered by the helmet. But per Disney's costume rules, adults can't have their face covered. So I have to shift the whole helmet up a touch and allow my eyes to be seen. Which honestly, I'd prefer from a visibility standpoint anyways, so I'm not too upset about this forced adjustment. So we started off by drawing the cutout for my face.

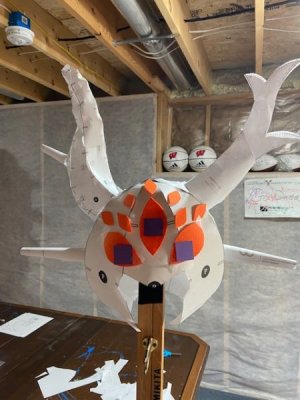
Next, I started drawing out the eye holes. Based on our proportion calculations, the eyes should be roughly 4 inch long and 2 inch wide wedges. But once I drew them I didn't like the placement of them and then started erasing them. That's when I decided we'd be better off creating the wedges, and then we could adjust the position of them on the fly. So I found some scrap orange felt for the eyes and some purple craft paper to emulate the size of the LED screens. After some adjustments, we settled on the following:

thumbnail_IMG_7212.jpg

To keep the helmet mirrored from one side to the other, the plan is to use the first and second wedge, and then the third wedge will just be the first wedge in a reverse mirror. This should hopefully keep everything looking even on both sides. Originally I was worried the LED screens might be too small, but after placing it on the model, I'm happy with them. I had to make sure the screens weren't too close to each other because there is some extra electronic components, but we'll cover that when the time comes.

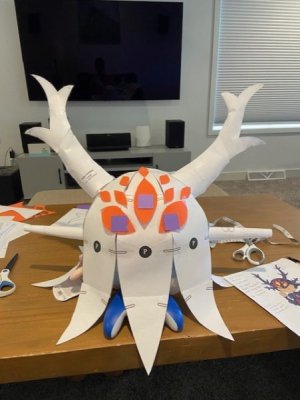
Next up were the horns. The horizontal horns were easy. They're just a simple cone pattern. So I determined we wanted them about 1 inch in diameter, and then the tips are 1/2 the size (so 0.5 inch). Did calculations, and then just made a simple trapezoid pattern that when folded up gives us the cone shape with a little extra slanted tip. For the more complicated horns, I went back to my Pretzl Cosplay horn pattern (link). We felt as if the large fawn antler was the best choice. So we printed that off aiming for a 12 inch horn, and then assembled them.

thumbnail_IMG_7213.jpg

The look was definitely coming together. But I wasn't completely sold on the vertical horns. We were going to edit the spires of the horns anyways because the Darcy helmet is a little different. But these horns consist of only two patterns stuck together. So it was some 3-D shape to it, but by in large they're pretty flat. So from the front on they have a good look to them, but from any other angle they lack a realistic appearance depth. But we decided to wait to solve that issue for the time being. Next us was to see how the helmet looked on my head.

thumbnail_IMG_7214.jpg

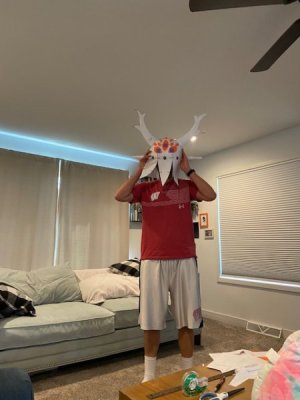
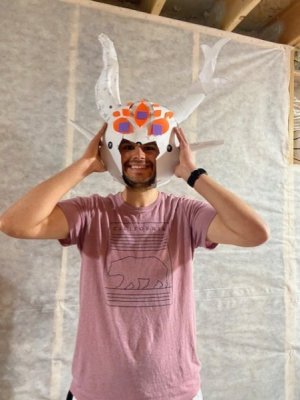
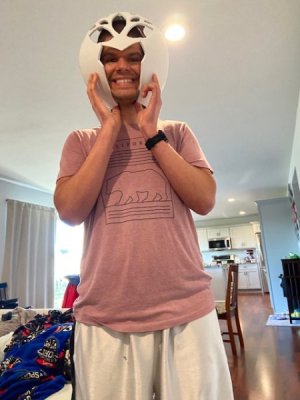
G kept saying it was giving off a creepy octopus vibe. So we cut out the front of the helmet for my face, and then tape off the bottom of the helmet. The debate was whether I should wear the helmet so that my head is centered (and thus face is an inch or so back, or whether my face should be pulled forward and the helmet off center backwards. We decided we liked the look of it pulled forward because of the lessened shadows on my face and the off centered aspect is barely noticeable.

thumbnail_IMG_7224.jpg

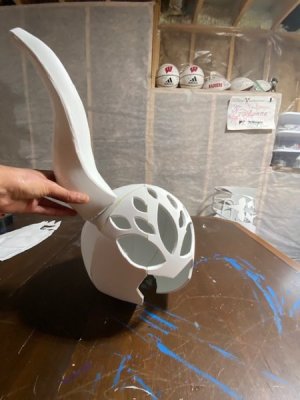
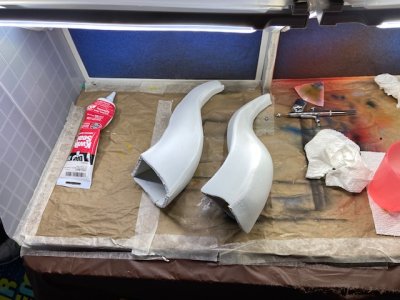
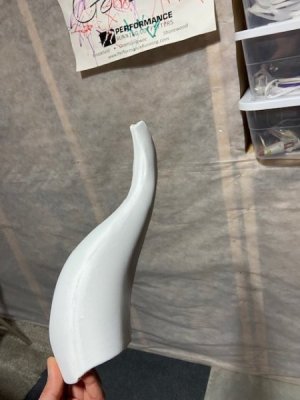
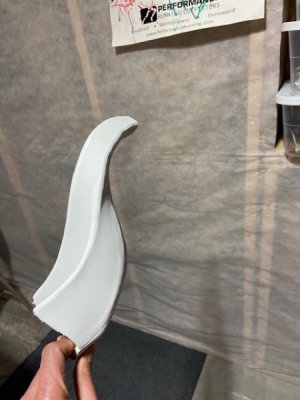
The helmet was definitely coming together at this point. Now was when we decided to re-evaluate our vertical horn choice. I went back through my pattern selections and found one in the Kamui Cosplay selection that was close. It's this "long horn" pattern (link). It's got a similar wavy pattern. It's meant to be worn heading backwards, but if you switch the side of the head and point it vertical, then it kind of gives off the correct look to it. It's a four panel design and so it adds a lot of depth to the piece from all angles. I also think given our paint choice (hot metal violet) that has a lot of color changing aspects depending on accessibility of light, I think the horns are really going to be on point. So we were pleased with the choice. I cut the tip off because Darcy's horns are blunted and have an orange glow to them because they're suppose to be like access ports/electrical areas.

thumbnail_IMG_7230.jpg

thumbnail_IMG_7231.jpg

So that's about where we left off with the helmet. I'm really pleased with the overall look and feel like this is going to work out really well. Still got to design the back port, but then we can start putting it together for real.

Next -
Next Darcy Helmet Update -
 
Amphibia Costumes - Darcy Helmet - Part 2
So, the paper version of the Darcy helmet is where we want it. So now it's time to transfer the pattern over for EVA foam. Believe it or not, this was the first time I was working with something other than translucent (Plastazote) EVA foam that was of a normal thickness. When we made the Monster's Inc. laugh canister and hats we used the standard high density EVA foam, but at a 2mm thickness. For most of the Amphibia costumes, we're going to be using a 6mm thickness. This is the particular foam we're using (link).

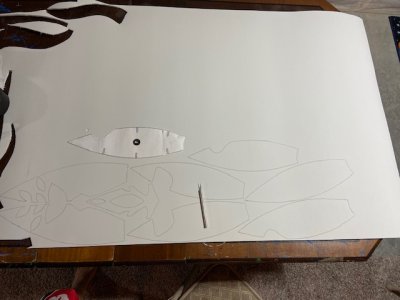
I started with the horn patterns as that seemed like one of the easiest places to start. I had already used these exact patterns before for G's Anne hairpiece. The difference being her was cut onto Plastazote foam and these on the non-translucent high density EVA foam. I learned very quickly that dense really meant dense. Using the same blade I've been using, it was a challenge to cut through the foam. I came up with a technique after a few trials and errors. I'd do one pass to just create a small line along the traced pattern. Then I had to hold the blade like a neanderthal to put pressure on the cutting and not on my hand. It took about 2-3 passes with this very strong cutting technique to finally get the pattern out. So don't skip arm day if you plan on cutting this foam. It really is as dense as they say. No more evident then when I broke out the Dremel and sanded the edges smooth prior to gluing them together.

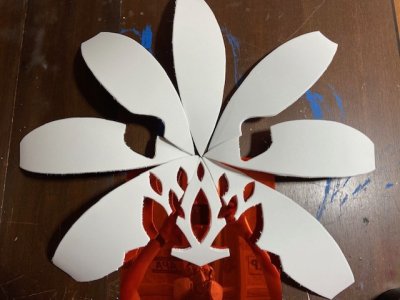
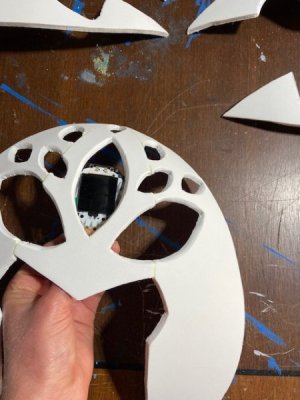
Once I got the horns started, then I moved to the spherical helmet. I traced out the eye holes and horn holes onto the pattern. Based on my experience on how hard it was to cut the EVA foam, I figure I'd need to cut out the holes in the pattern before assembling it. Unlike when working with the Anne hairpiece made out of the other foam when I could easily cut out holes from the underneath when I was trying to let light through. This did have an upside though as this allowed me to be precise with the layout of the eye holes. So I labeled the eight wedges A through H. With A being my right cheek, B being the middle, and then C was a mirrored pattern of A. So instead of actually making a C wedge pattern, I'd just flip the A pattern over and then I'd get a mirrored image on the left cheek of my face. I did the same with the middle B wedge. I folded the paper pattern in half and then cut it out like a paper snowflake so that it would have a mirrored image shape on either side of the middle. Then wedge D/E were mirrors of G/H. Lastly F was just a full wedge (that it eventually will have a hole in the back for the port). Laid out the patterns onto the 6mm foam.

thumbnail_IMG_7249.jpg

Cut them out with the blade and laid them flat into the spherical shape.

thumbnail_IMG_7253.jpg

I finally got to pull out what's going to cover the eye space not covered by the uncanny LED eye screens. Based on the Darcy character, the space other than her eyes needs to be orange. I wanted something that gave off a metallic look to match with the metallic helmet appearance. I also wanted something that didn't really allow you to see behind it well, because then I could hide the mechanisms of the uncanny eyes. After some searching I found a solution, Mandalorian helmets. For Mandalorian cosplayers they have very strict rules on how your face can't be seen from under the helmet. So the plastic piece they have for a visor is mirrored and generally not see through. I found a high quality maker, Kalevala, which had a ton of different options. We went with "Flame".

thumbnail_IMG_7254.jpg

It's pretty sweet and I think it definitely has the appearance I was going for.

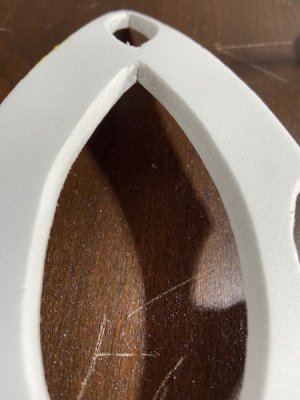
I broke out the Dremel and started sanding all the edges down. I figured this would be easier before it was assembled. The pattern instructions don't have sanding recommendations for the connecting edges, so I just sanded those flat. Then for all the eye holes, I decided to give it a beveled look. I did have to go and buy a new Dremel accessory to be able to get into the small crevices of the corners of the eyes. But I was happy with the final look.

thumbnail_IMG_7255.jpg

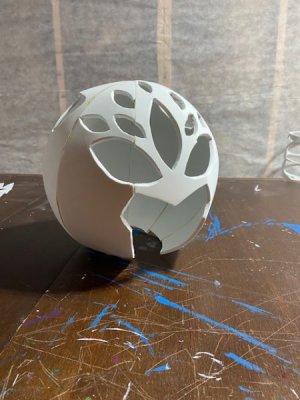
Next up was assembling the piece. I put the pattern lines on the inside edges, and then used Barge glue to attach everything. I had a minor freakout when I had put a pen mark on an edge that wasn't being glued. But a minor touchup with the Dremel made it disappear.

thumbnail_IMG_7259.jpg

thumbnail_IMG_7260.jpg

thumbnail_IMG_7261.jpg

Now again, this is our first time with the 6mm foam, and with the intent of it not being light emitting. Which meant it was our first time wanting to really diminish the appearance of the seams as much as we could. The first tip for smoothing out the seams is using DAP Kwik Seal all-purpose caulk (link). While not required, I think?, I wore nitrile gloves when working with this stuff. I put a little on my finger, and then smoothed it over the edges of the seam. I found it took two passes to get good coverage on the seams. So one pass, let it dry, and then a second pass.

thumbnail_IMG_7252.jpg

Then, as we learned from the armor painting, the finish needs to be smooth. So that required sanding. I initially tried using the Dremel, but the angles were tough and I was making marks where I didn't want them. I ended up switching to traditional sandpaper (link). I bought a series of three grits (150, 220, and 400). And worked my way from low to high in three successive passes. The final finish is quite smooth.

thumbnail_IMG_7251.jpg

thumbnail_IMG_7250.jpg

While it didn't completely eliminate the seams, it dramatically reduced them. The helmet was a bit tricky because the front of the helmet has some weak spots, but with a delicate touch I was able to get it looking good.

Next up was working with the uncanny eyes. I've done a little work with the programmable LEDS (not yet detailed here) and those have been trouble. So G and I were a little worries how complicated the animated eyes were going to be.

Next -
Next Darcy Helmet Update -
 
Amphibia Costumes - Darcy Helmet - Part 3

Finally time for the uncanny animated LED eyes. I feel like this is the step that's going to take my Darcy costume from good to great. That next level detail with actual working animated eyes. So I was a bit worried about how difficult this process was going to be. I had done a little work with programmable LEDs (not yet detailed) and those have been difficult. So how would the animated eyes go?

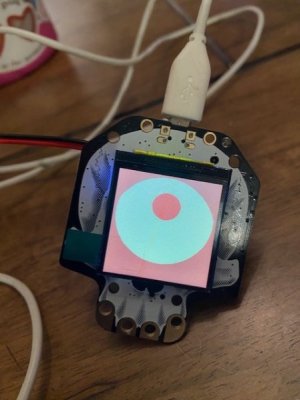
For this project, I'm using the Adafruit Hallowing M4 Express Goth Black (link). The beauty of this chip, is that it's exact purpose is uncanny eyes. So the chip should be pretty close to plug and play. Which for someone who isn't completely savy in computer engineering is a bonus. In addition to the Hallowing, I also have a Lithium Ion Cylindrical Battery 3.7V and 2200mAh (link) and a JST on/off extension cable (link). I haven't tested yet how much 2200mAh gets me on the eye, so we'll see if that's enough juice for the whole Halloween party. I got the extension cable because I found unplugging and plugging into the JST port on the chip was a bit tricky. And I don't think it's something I could do often. I later learned the Hallowing has an on/off switch of it's own. But regardless, I think it'll be easier to work with the extension cable in the final product.

thumbnail_IMG_7258.jpg

You can see the chip has a skull design. The Hallowing has a ton of other uses outside of my purpose, including LEDs of its own, can run LEDs, run sound effects, and can even sense light (for making pupils bigger or smaller). But once you give it power, it has a sample code that can run.

thumbnail_IMG_7271.jpg

The next step was going through the Adafruit instructions on how to customize your eye (link).

Step 1 - Updated the UF2 Bootloader

It was easy enough to upload it. Once I did the screen went black with some text on it, describing how to get into REPL (a circuit python help screen?). It also confused my Mac because it was looking for a keyboard. So I was a little worried. But I moved onto the next step.

Step 2 - Download new M4 firmware
Super simple and just as the instructions describe.

Step 3 - Choose from 13 pre-set designs.

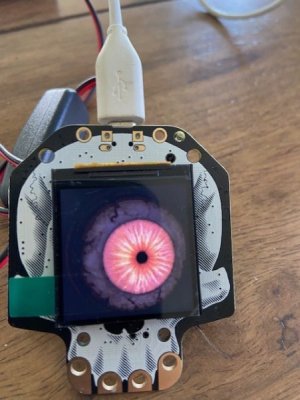
The firmware folder has 13 pre-set designs that you can choose from. As described in the instructions, you simply choose the folder of the preset eye you want and drag it into the chip drive. I made sure to delete the previous versions that were on the chip already. So that meant deleting the "hazel" folder, and the "config.eye" file. Then instead I'd have my new preset folder alone. Then go into the folder and drag the "config.eye" file into the root directory (i.e. out of the preset folder you just dragged onto the drive and instead in the open space outside the folder). It's important to do this step and deleting the previous folder. The chip can have as many as four different types that can be cycled through, but I found it easier to work on one at a time. Then when you're ready, just hit the reset button and it'll upload the new code. If it worked, then it should go from one pre-set animation to another one. Here's a few examples:

thumbnail_IMG_7273.jpg

thumbnail_IMG_7277.jpg

thumbnail_IMG_7275.jpg

So after going through a few different options, none of them looked exactly like the Darcy helmet eyes. So we knew we had to do some tinkering customizations. We felt as if the last image above "fizzgig" was the closest to the Darcy eyes and possibly the easiest to customize from.

Step 4 - Customize the eye

There's really only one key file that needs to be customized. As per the instructions, you just need to edit the text file "config.eye" as it contains the instructions for the animation. It's really short and to the point. Again, super user friendly and no programming knowledge needed.

thumbnail_IMG_7293.jpg

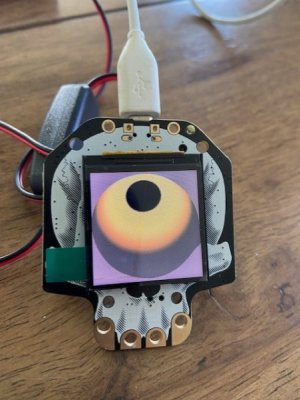
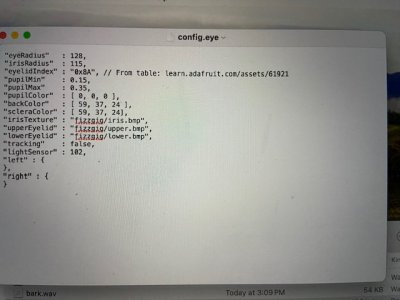
Each of the different line items represent something the eye is doing. Whether it's the size of the eye, the color of the pupil, the texture of the iris, etc. While I'm not a computer programmer by any stretch, I do have some coding experience with a statistical program SAS. And the one thing I know, is when you don't know what you're doing, you make as little changes as possible before seeing if it's working as intended. So G and I went through and changed each line item one at a time. First changing the pupil color from black [ 0, 0, 0] to red. We didn't use this exact website, but something like it (link). We learned that 0,0,0 is black, and we wanted a redish color which was something like 255, 0, 0. So we changed the 0,0,0 in pupil color to 255,0,0. Then I uploaded the new folder, deleted the old folder, and dragged the "config.eye" file out into the root directory. G pressed the reset button, and then we saw if the change occurred. If it worked, then we moved on to the next line item. If it didn't work, then we needed to troubleshoot it.

We didn't know what back color and sclera color would change, so we just changed it to hyper green and then saw where the hyper green appeared. Then we tried to change the Iris texture and that's when we hit our first road block. We wanted a simple yellow color. But whenever we'd delete "fizzgig/iris.bmp" and imput [239, 255, 0] instead we'd get an error. We knew there was an error because when the code uploaded, we'd get a default blue screen in that section. We tried deleting the iris.bmp file as well but that didn't work. So I ended up opening the iris.bmp file in Adobe photoshop and messing around with it in there to change the colors into a solid yellow. Uploaded that, and it worked. But as I'm writing this update now, I see the error was likely that we needed to change the sub-header for that section from "irisTexture" to "irisColor" and I bet it would have accepted the simple color code then.

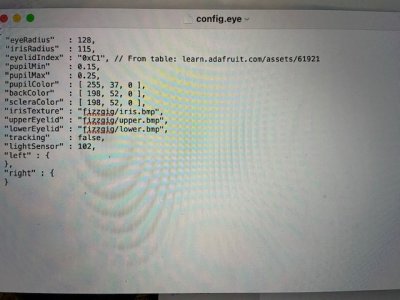
Regardless, the one place we couldn't get to work was the background purple color on the original fizzgig file. The only other thing remaining was the "eyelidIndex" and sure enough the code "0x8A" stands for purple in that computer language. I'm sure there's some reason that some places use "0x00" and others use [R,G,B} but I don't know why. So we futzed around with some deep orange color choices. We were trying to match the "backColor" and "scerlaColor" but in one case written in RGB and the other in this other format. Eventually we found the same matching color in both. And this deep orange also matched reasonably well with the orange on the Kalevala visor. So our final code looked like this:

thumbnail_IMG_7294.jpg

So anyone planning on emulating the Darcy eyes we made should just follow the above. We still might edit it a little, but for now this is the look we've got.

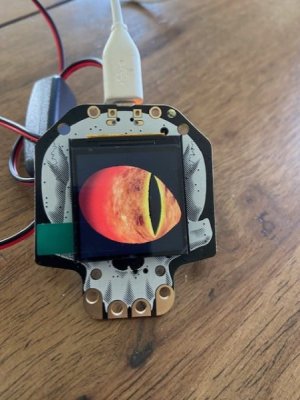
thumbnail_IMG_7283.jpg

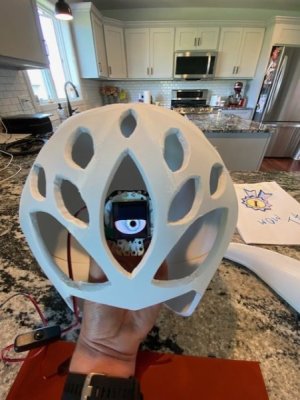
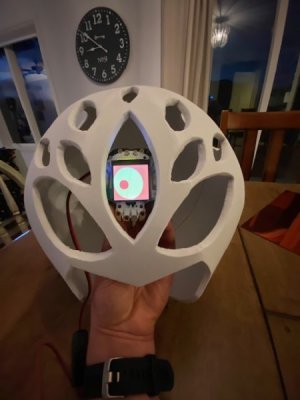
Real simple, orange, yellow, red look. It blinks and everything too. And in the helmet looks like this:

thumbnail_IMG_7285.jpg

You can also see the more finished sanded appearance and see how the seams have sort of disappeared compared to the Darcy 2 update.
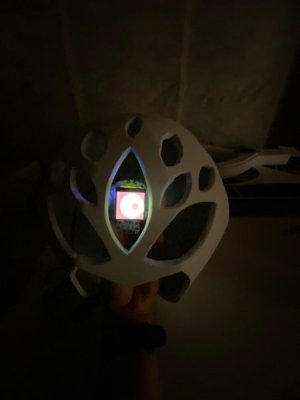
Also, in the dark.

thumbnail_IMG_7295.jpg

One catch is that the screen doesn't photograph well from a distance. It sort of just looks like a bright light. I would say at about 10-15 feet is when as a person it gets harder to tell what you're looking at. Like you know it's an eye, but it sort of blurs together. I think partially that's a function of the Darcy eye being three similar colors (orange, yellow, and red) with no black outlines. So we might still play around with it a little more before finalizing it. But I think we're like 90% of the way to the finish line for this. I've ordered two more now that I've proven they work well. The only other test is to see whether the program is a set pattern so that I can turn on all three eyes at the same time and get them to follow the same sequential movement. That remains to be seen. They do sell a two set "Monster Mask" that has two eyes that are programmed to move in sequence, but I have a three eyed helmet anyways so that wouldn't 100% work.

Outside of the eyes, we're making good progress. I was expecting this portion of the costume to be a lot harder than it ended up being. So I'm thankful for that. I really feel like these animated eyes are a really next level part of the costume and couldn't be happier at this point with how they look. Next up is finishing off the horns, assembling everything, and then we get to painting the helmet!

Next -
Next Darcy Helmet Update -
 
This is coming together so well! I feel you on the LED programming being complicated. I know HTML and some PHP-era stuff and when I looked into something to upgrade my Electric Water Pageant costume, I quickly bowed out. Hoping as these things get used more, some simplified UIs will also come along!
 
Congrats on the hard work. That middle eye is seriously creepy

Thanks!

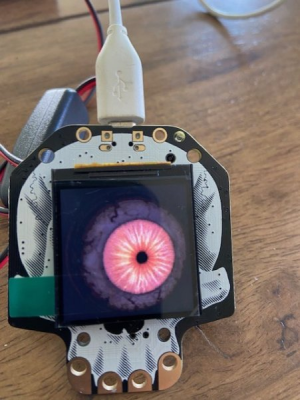
1715630248207.png

This one is listed as "skull" in the folder, but is the only one not to appear in the instructions. Possibly added at a later date.

This is coming together so well! I feel you on the LED programming being complicated. I know HTML and some PHP-era stuff and when I looked into something to upgrade my Electric Water Pageant costume, I quickly bowed out. Hoping as these things get used more, some simplified UIs will also come along!

Thanks!

I don't even feel like I've gotten even that far with it yet. It's for the Anne tennis racket that glows blue. Without going into full detail I:

-Attached Neopixel LEDs to RP2040 Prop Maker chip. Got pre-loaded program to illuminate when plugged into power source. So I know connection is good enough to illuminate strip. Although I was a bone head and thought I had a bad LED when only the first half of the 120 LED strip illuminated. Excised that LED, soldered it (badly), and then re-tried and still didn't illuminate second half. Learned later than pre-loaded program was written for 60 LEDs and not 120 LEDs...
-Connected to laptop and uploaded simple single LED on chip blinking program. Chip LED blinks. So cord is good and chip accepting new programs. Worked in Arduino and CircuitPython.
-Uploaded simple code to blink first Neopixel LED. Nothing happens.
-Reset chip and pre-loaded program runs again just fine.

So leads me to believe something is wrong in the simple Neopixel LED program as it relates to my system since the LEDs can be illuminated, the cord seems to transmit new successful code, and resetting puts me back at the start. I'll probably see if any of my neighbors or my cousin have any ideas because I spent about 8hrs troubleshooting it and gave up. Moved onto the Darcy helmet for now.
 

GET A DISNEY VACATION QUOTE

Dreams Unlimited Travel is committed to providing you with the very best vacation planning experience possible. Our Vacation Planners are experts and will share their honest advice to help you have a magical vacation.

Let us help you with your next Disney Vacation!


facebook twitter
Top